
KYLIEBYTES: How to customize your iOS 14 home screen
It’s complicated, but I’m here to help
September 30, 2020
With the anticipated release of Apple’s newest software update on Sept. 16, many creative users are learning how to edit their home screen with custom icons, widgets and more. I spent about an hour watching a 10-year-old on YouTube explain it to me, and I’m still not done with my own home screen. It’s a process, but it’s cool. I am here for the people, so, this is how you customize your iOS 14 home screen.
Step 1: What apps do you want to keep?
The newest update allows you to effectively hide certain apps to better fit your aesthetic and declutter your screen. I find it’s easiest to start this process by figuring out what apps you’d like to keep, and what apps you’d like to hide. Simply hold one of your apps until it shakes, tap the minus sign on the app you’d like to hide, and tap “Move to App Library.”
Step 2: What pictures do you want to use?
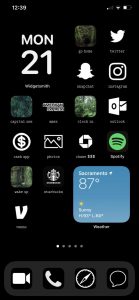
I personally love an all black theme to protect my eyes at 3 a.m. when I open my phone. As you can see below, I chose to use a mixture of logos and aesthetic pictures to fit my theme. I found those logos by Googling “(app name) black logo.” if I couldn’t find it, then I used an aesthetic picture instead. Use what suits your needs.
Step 3: Using shortcuts to create custom app icons
This is where it gets complicated. In order to use your pretty pictures, you’ll need to create an app shortcut. The easiest way to do this is swipe down on your home screen, open the search bar and search for the “Shortcuts” app. Once you’re there, tap the “+” button in the top right corner to create a new shortcut. Search for “open app” and tap that option. After that option appears, tap the highlighted portion to choose the app you’d like to open. To add it to your home screen, tap the three dots in a circle in the top right of the screen.
The first option to type in text is simply what will show up in the Shortcuts app, so name it something you’ll remember in case you want to edit it later. Tap “Add to Home Screen” to edit what will show up on your home screen.
The text you enter here is what shows up on your home screen, so if you want to use a pretty font like I did, I prefer to use LingoJam. To add a picture, tap the icon next to the text and tap “Choose Photo.”
Step 4: Creating widgets with Widgetsmith.
You might have seen “Widgetsmith” on the bottom of those big blocks on my home screen. That’s an app you can download to get cool widgets. Widgets are blocks that provide tools such as turning on your 6:30 alarm, or opening a specific Spotify playlist. With Widgetsmith, you can do different color clocks, dates, weather and even add your own pictures as blocks. I highly suggest downloading Widgetsmith as your first widget tool, and then exploring Apple’s widgets afterward.
To use Widgetsmith, go into the app and edit whatever widget you fancy most. They come in small, medium and large. Remember to name each widget so that it’s easier to add it to your home screen in the next step.

Step 5: Adding widgets to your home screen.
Simply long hold any app on the home screen until the apps shake, and tap the “Edit Home Screen” option. Tap the “+” button in the top left corner – this will show all your available widgets that Apple curates for you. Some of them are really neat, so pick what you prefer.
To utilize your Widgetsmith widgets, type “Widgetsmith” in the search bar. Once it opens, you are given three options: small, medium or large. Choose whatever widget size you customized already in step four, and it will drop onto your home screen. If you want to choose which widget to display, just tap the widget and it will bring up options of different widgets you created.
Now you’re done! Here’s my secret: I don’t think I’ll finish customizing all my apps. It takes forever, and something that I dislike is that creating shortcuts will open the Shortcuts app first before redirecting to the app you want to go to. It sort of ruins the seamlessness of technology for the sake of aesthetics, so I might lean more boomer than zoomer on this one. It just depends on what matters more to you, functionality or pretty buttons. It’s your choice to make, but have fun with it!